Sunday, January 12, 2014

Wa'apa build - Part 24 (Mast step)

In between holiday obligations and the days too cold for working with epoxy, I've gotten the mast step constructed and in place. It's same basic design as to what Mr Dierking showed on his Va'a Motu build..


Support the hull so that the bulkhead is level..I use it as reference for measuring and level.

Measure out and mark position of mast step on gunwales. Mast step is further ahead than this picture indicates..

Then using level transfer marks down to bottom of hull.

Measuring device use to get width measurements for creating bulkhead templates.

Bulkhead template...

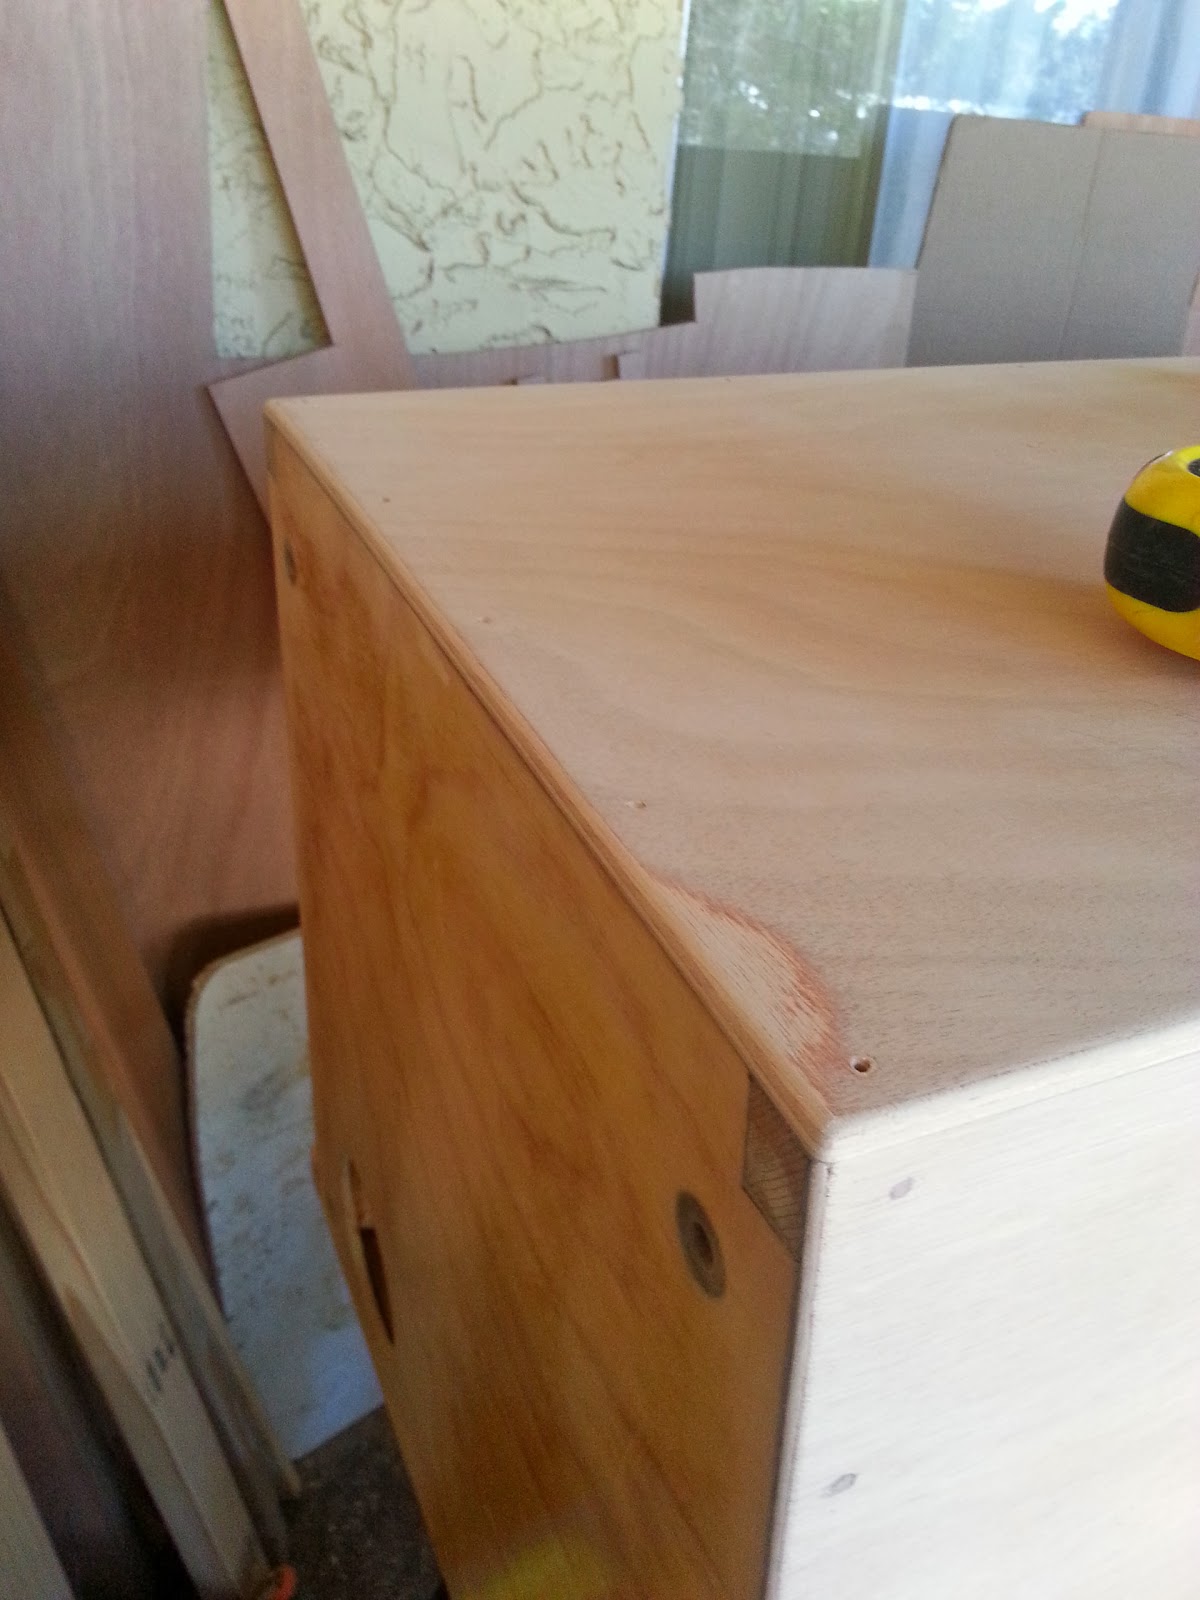
Mast step is made of a box, which goes between two semi bulkheads.

Glue two halves..

Epoxy coat inside and then glue box together..

I glued on a bit of hard wood to bottom of step for durability.

Step is sandwiched between bulkheads and sits on the bulkhead timbers, should be quite
strong and spread loads well.

Holes cut...

And gluing into place..

Then gluing in some timber next to step so that saddles, cleats, etc can be installed in this area. Also timbers on outside of bulkhead proving extra support for floor..

Box cut flush..


It's all quite solid and feels plenty strong, will be stronger yet once the floor is laid down...

Monday, December 2, 2013

Wa'apa Build - Part 23 (finishing the glass, graphite coating)

Been a long while since last update. I've been a combination of busy and lazy, neither of which is conducive to large amounts of progress...

With the glass layed and cured it was time to finish it off..filling the weave and such.


The corners were rounded to allow the cloth to lie down, and needed to be built back up. I used a mix of wood flour and graphite to make a thick batch of epoxy to build the edges up. 


When that cured I then sanded it to a nice fair and sharp edge again..but seem to have misplaced that picture...

With that done I then used a thin graphite / epoxy mix to finish filling the weave and coating the bottom.


Looks really good I think. One more coat and some wet sanding will really finish it off...but I'll wait until I'm further along and done banging it around so much...

On to some more interesting bits...and quicker progress I hope!

Thursday, October 17, 2013

Wa'apa Build - Part 22 (Glassing the hull)

With a couple hours here and there I've managed to get the glass on the hull, and thankfully without messing it up!

I used 50 inch wide 6 oz cloth, which I cut lengthwise down the middle to get two pieces, one for each half hull. The roughly 25 inch wide lengths are wide enough to allow covering the bottom with 4 inch overlap up the sides.

I marked 4 inches up the sides at regular intervals, and then ran some masking tape along those marks.

Then I draped and smoothed the cloth, and cut the excess from the front.

The cut offs to be used for glassing the middle bulkhead seams.

Area masked off and piece of cloth fitted.

Then wet out

Once it got a little rubbery I cut along the edge of the tape and pulled off the excess.

Then did the same thing along the sides.


Once those cured I carefully sanded along the edges to make a smooth transition for overlapping the cloth for the bottom..so as not to have a big bump. Then came the big job of doing the bottom.

All wet out...


And excess cut off once it cured a little bit rubbery.


Still have to fill the weave and do the other half hull as well, but so far so good!

Thursday, October 3, 2013

Wa'apa Build - Part 21 (Sunshine & rounding edges)

Been a while since last update. I recently started a new job and time for the boat has been pretty limited...but still slowly making some progress...

I managed to catch a nice day and got the hulls outside, bolted together, and sanded fair. Really great to see it out in the sun as a whole after so much time fiddling with one half at a time...


Then it was back inside to continue getting them ready for glassing the bottom. I got to work rounding the chines and such in order to take the glass cloth..

Using marking gauge and pencil I marked the chines about 2mm on either side.

With the marks as a guide I chamfered the edge with a block plane.

Then I used a sanding block to round everything over nicely.


Soon now will be time to commence glassing...which should be interesting as I've never glassed anything before. Let's hope it all goes well! :)

Thursday, September 19, 2013

Wa'apa Build - Part 20 (Torture board and cockpit floors)

I made a torture board from a length of 6mm ply, some scrap pine, and a 120 grit sanding belt to start going over the hull and fairing things up. I did take the hulls outside and bolted them together for sanding, but got rained on before I thought to take a picture of it all together...next time.


After sanding as much I could inside I decided to cut out the cockpit floors. One floor must be two pieces since I'm using remnants of 6mm sheet used for hull bottoms and it's not possible to get them both as one piece. I knew this would be the case, and it doesn't hurt anything..just have to do a butt joint there.


Sunday, September 15, 2013

Wa'apa Build - Part 19 (nose piercings & decks)

A while since last update...


Borrowing from Gary Dierkings Va'a Motu design I decided to put some large wooden dowels through the end sections near the stem. I think they look neat and should provide a nice place for tying up, tying down for transport, carrying, etc. I've taken to calling them nose bones/piercings..as that is what they remind me of.
Simple template made to ensure holes all end up in same place.

Backing block clamped on to prevent tear out.

Nice clean holes.

I made some small ply rings to double up and strengthen the area a bit.

Glued in and small fillets added inside & out.


Then I glued in the deck supports and glued down the decks.


Next I think it's time to drag the hulls outside so I can bolt them together and do any fairing necessary and get the bottom ready for glassing.